

Safe Operating Practices for Mini Excavator Operators on Construction Sites
Safe mini excavator operation on active construction sites depends on planning, consistent habits, and awareness of everyone nearby. These machines are compact and easy to move, which makes them valuable in tight spaces. That same size can make their hazards easy to underestimate. A swinging upper structure, a buried utility, unstable ground near a trench edge, or an unattended machine with controls left live can all cause serious harm when crews skip steps. The stakes are especially high on occupied sites such as schools, hospitals, retail centers, and neighborhoods, where people unfamiliar with construction hazards move through the work zone every day.
Mini excavators bring together several hazards at once. Moving parts, hydraulic pressure, suspended loads, buried services, and shifting ground can each cause injury on their own. On a busy site, they often combine. A laborer walking behind the counterweight, a buried conduit the locator didn’t reach, a bucket dropped from an unsecured coupler, or a machine parked across a fire lane are each one missed step away from a serious outcome. Safe operating practices work by closing those gaps systematically, shift by shift, task by task, so that no single missed step leads to a preventable injury.
This guide covers the practices that matter most: pre-operation inspection, utility identification, work zone management, machine stability, attachment safety, and proper shutdown. Each section explains what to do, why it matters, and what can go wrong when it’s skipped. The checklists and key takeaways give you a starting point you can put to work before the next shift.
Pre-Operation Inspections
A walkaround inspection is the first safety step of every shift. It takes about 10 to 15 minutes and catches the small problems that turn into failures, injuries, and downtime before the machine ever moves. Start with the machine parked on firm, level ground, the bucket and blade lowered, the engine off, and the key out. Never inspect under a raised boom or bucket unless it’s supported with the manufacturer’s approved method.
Work around the machine in the same order every time. Check tracks or tires for cuts, missing lugs, damaged rollers, and correct tension, and clear packed mud and rock from the undercarriage. Inspect the bucket and teeth for cracks and wear. Check the quick coupler, locking pins, and pin retainers. Look at hydraulic hoses and fittings for leaks, abrasion, and rubbing points against the frame. Inspect the boom, arm, cylinders, and pins for cracks, bends, and loose hardware. Check engine oil, coolant, hydraulic fluid, and fuel levels. Never search for a hydraulic leak by running your hand along a hose because pressurized fluid can penetrate skin and cause serious injury. Use a piece of cardboard instead, and wear gloves and safety glasses. Once the outside is done, check the cab: seat belt, hydraulic lockout, controls, horn, alarms, lights, beacon, mirrors, and windows. Start the engine, watch the gauges, and test each function slowly in a clear area before beginning work.
Defects that affect safe operation must be reported and corrected before the machine runs. That includes a silent backup alarm, a leaking hose, a damaged seat belt, a sticking control, or a coupler that won’t lock. Tag the machine out of service, control the key, and record the findings in a written checklist or maintenance log with the date and hour meter reading. A two-minute check at the start of a shift has prevented far more injuries than most operators realize, and its absence has contributed to far more than any crew wants to count.
Key takeaway: Inspect tracks, bucket, attachments, hoses, controls, warning devices, fluid levels, and safety systems before every shift, and keep the machine out of service until any defect that affects safe operation is fixed.
Identifying Underground Utilities
Buried utilities are among the most serious hazards in excavation. Striking a gas line can cause a fire or explosion. Striking an electric line can electrocute the operator or anyone touching the machine. Water, sewer, and fiber strikes cause flooding, outages, and costly repairs. In the United States, the process begins with the one-call notification center. Call 811 or submit a request online before any digging starts. The center notifies member utility owners, who send locators to mark their lines. Confirm that every notified owner has responded, and wait for marks before you dig. Locate requests cover only the area you describe, so white-line the planned excavation with paint, flags, or stakes before the request. If the work extends beyond that area, request a new or extended ticket. When marks fade, request a remark rather than relying on memory.
Public locators mark only lines owned by participating utilities. Private lines often go unmarked, including site lighting, irrigation systems, service lines to outbuildings, private laterals, data and security cabling, and abandoned lines. Ask the property owner or facilities manager about private services, and hire a private utility locator when private lines may be present, which on schools, campuses, and commercial sites is nearly always. Review locate marks with the whole crew, and compare them with site plans, as-built drawings, and surface clues such as meters, valve boxes, light poles, and cleanouts. When marks and plans don’t agree, stop and resolve the conflict before digging.
Key takeaway: Contact the one-call service before every excavation, keep the ticket matched to the actual work area, locate private lines separately, and expose every line inside the tolerance zone by hand or vacuum before the bucket gets close.
Establishing a Safe Work Area
A mini excavator’s upper structure rotates a full 360 degrees, and its counterweight swings close to the tracks. In tight spaces, the area around the machine becomes a hazard zone the moment it starts working. Before any digging begins, walk the work zone and identify pedestrians, vehicles, overhead lines, unstable edges, and obstacles. Plan where the machine will sit, where spoil will go, and where workers on foot will stand at each stage of the job. Coordinate with the property owner on pedestrian traffic, access routes, and working hours, especially on occupied properties where people unfamiliar with construction move through the site every day.
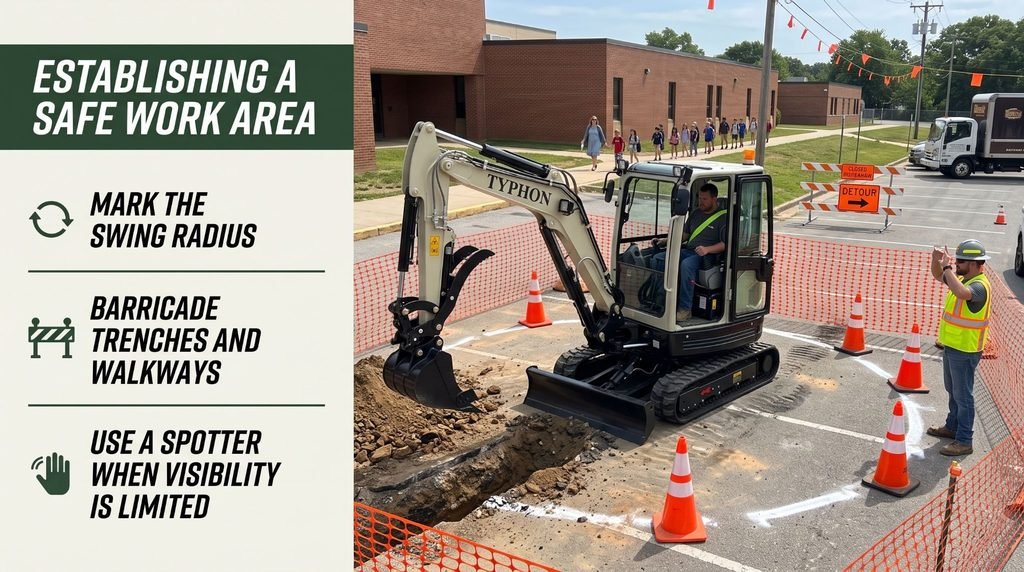
Assign a trained spotter whenever visibility is restricted, such as near buildings, at blind corners, or when other workers must be nearby. A good spotter stands where the operator can see them, stays outside the swing radius, uses agreed hand signals or radio calls, and has clear authority to stop the machine. The operator should stop immediately whenever the spotter’s signal is lost. Workers on foot should make eye contact with the operator before approaching. Nobody should walk behind or beside a moving machine without a clear signal from the operator first, as a silent backup alarm and a 360-degree swing leave no warning for someone in the wrong place at the wrong moment.
Key takeaway: Check the work zone for pedestrians, vehicles, overhead lines, unstable edges, and obstacles, mark the swing radius, use barriers and exclusion zones, and assign a trained spotter whenever visibility is limited.
Maintaining Machine Stability
Mini excavators are compact, which makes them easy to transport and maneuver. That same compact size means they can tip more easily than many operators expect, especially on slopes, near edges, or when lifting. Every mini excavator has slope limits listed in the operator’s manual. Common practices include traveling straight up and down slopes rather than across them, keeping the bucket low and close during travel, avoiding swinging a loaded bucket downhill, and using the blade on the downhill side for added stability where the manual recommends it. When a slope exceeds the machine’s limits, grade a level work pad or choose a different method. Watch for soft or saturated soil after rain, recently backfilled trenches, frozen ground that thaws during the day, and voids over old utilities, septic tanks, and cisterns, and use timber mats where needed to spread the machine’s weight across weak ground.
Lifting is where many tip-overs begin. Before lifting any load, confirm the machine is approved for lifting and has an approved lifting point. Check the load’s weight using delivery tickets or manufacturer data, and review the lift chart for the machine’s configuration, boom position, and reach. Lifting capacity drops sharply as reach increases and when loads swing over the side of the tracks. Use rigging rated for the load attached only to the approved lifting point, lower the blade and lift over it where the manufacturer recommends, and keep the load close and low. Never allow anyone to stand under a suspended load. Hooking chains to bucket teeth is never an approved lifting method. Some jobs and jurisdictions also have specific rules for using excavators to lift, so check the applicable requirements before starting.
Key takeaway: Stay within the manufacturer’s limits for slopes, ground, lifting, and configuration, keep tracks back from unstable edges, lift only with approved points and rated rigging, and use smooth movements with the seat belt fastened.
Operating Attachments Safely
Attachments make a mini excavator far more versatile. Buckets, thumbs, breakers, augers, tilt buckets, and grapples let one machine handle many tasks. Each attachment also brings its own hazards, and one that isn’t properly matched or secured can fail without warning. Before connecting any attachment, confirm it’s approved for the machine’s weight class, fits the coupler or pin dimensions, and that its hydraulic flow and pressure requirements match the machine’s auxiliary circuit. A heavy attachment reduces lifting capacity and shifts weight forward, affecting stability. Using an incompatible attachment can cause poor performance, overheating, or hydraulic damage.
After connecting an attachment, verify it’s locked before any load goes on it. Quick coupler failures are a well-known hazard, and they often happen when an operator assumes the lock is engaged without checking. Visually confirm the locking pin or wedge is fully engaged using the coupler’s indicator where equipped. Perform the manufacturer’s test, which often involves curling the attachment and pressing it firmly against the ground. Lift the attachment slightly and watch for any movement at the coupler. Keep everyone clear during the test, and never swing an attachment over people even after the check passes. For powered attachments, set auxiliary hydraulic flow and pressure as the attachment and machine manufacturers specify, and confirm any required case drain line is connected. Breakers and similar tools can throw debris, so keep people well clear and use recommended guards or screens.
Attachment changes require the machine to be secured first. Park on firm, level ground, set the attachment down on stable supports, shut off the engine, and relieve auxiliary hydraulic pressure before disconnecting hoses. Wipe couplers clean and install dust caps on disconnected lines. Store removed attachments where they can’t tip or roll. When a second person helps, the operator should engage the hydraulic lockout and keep hands off the controls. Agree on signals before anyone approaches the attachment area. For maintenance such as greasing pins, replacing teeth, or repairing hoses, lower the attachment to the ground, engage the hydraulic lockout, shut off the engine, remove the key, relieve stored pressure, and apply lockout and tagout devices as required. Never work under a raised attachment unless it’s blocked with the manufacturer’s approved support.
Key takeaway: Use only attachments compatible with the machine’s mounting, hydraulics, and weight class, verify the coupler is locked with a visual check and ground test, set the correct auxiliary settings, and secure the machine before every attachment change or repair.
Shutdown and Safe Parking
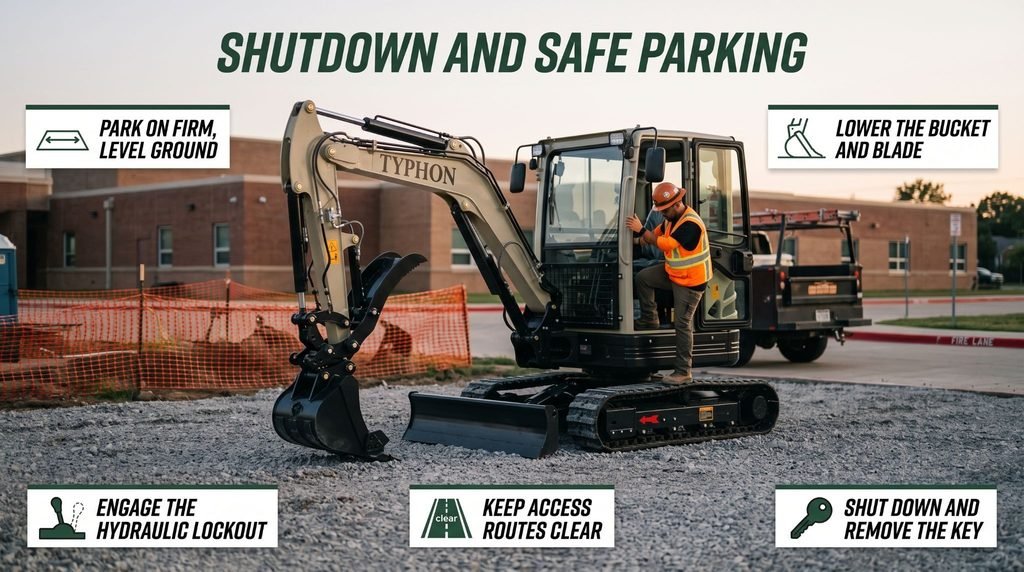
How an operator leaves the machine matters as much as how they run it. An unattended mini excavator with a raised bucket, a running engine, or unlocked controls is an accident waiting for someone to bump a lever. Park on firm, level ground whenever possible, avoiding slopes, soft soil, and spots near trench edges or excavations. Lifting performance depends on machine stability, load weight, boom position, and ground conditions, so operators should never leave a suspended load unattended. Keep the machine clear of fire lanes, hydrants, building exits, emergency routes, driveways, and walkways used by other trades or the public. When parking on a grade cannot be avoided, follow the manufacturer’s guidance, which often means positioning the machine as directed, lowering the bucket into the ground, and securing the tracks as specified.
Follow a consistent shutdown routine at the end of every task and shift. Lower the bucket or attachment flat to the ground. Lower the dozer blade. Return all controls to neutral. Raise the hydraulic lockout lever to disable the controls. Let the engine idle to cool as the manual recommends. Shut off the engine and remove the key. Unfasten the seat belt and exit facing the machine, using three points of contact. Never leave the cab with the engine running and the lockout disengaged, even for a moment. If you need to step away briefly, lower the bucket and engage the lockout first. Close and lock the cab door where equipped, store the key in a controlled location, and barricade nearby excavations and trenches before leaving the site for the day.
Before any maintenance or cleaning begins, control movement and stored energy hazards first. Shut down the machine, remove the key, apply lockout and tagout devices as required, relieve stored hydraulic pressure using the manufacturer’s procedure, and block any raised components with approved supports. Allow hot components to cool. Only trained personnel should perform maintenance and repairs. Verify the machine can’t move or start before anyone reaches into the work area. A consistent shutdown routine protects every person who walks past the machine after the operator steps away, and on occupied sites, that can mean anyone from a laborer to a student to a fire marshal on a routine inspection.
Key takeaway: Park on firm, level ground outside access routes, lower the bucket and blade, engage the hydraulic lockout, shut down and remove the key, and control movement and stored energy before any maintenance begins.
Conclusion
Safe mini excavator operation on construction sites depends on consistent procedures that every operator and crew member follows throughout each shift. A thorough pre-operation inspection helps identify defects before they create hazards, while accurate utility locating and careful exposure protect buried services. A clearly managed work zone keeps pedestrians and workers away from swing and travel areas, and checking slope limits, ground stability, edge setbacks, and lifting capacity helps maintain machine stability. Compatible attachments, secure coupler connections, and approved rigging reduce the risk of dropped loads or hydraulic failures. A disciplined shutdown routine also protects workers after the operator leaves the seat. Before starting a job, complete a walkaround of tracks, bucket, attachments, hoses, and machine structure, then check engine oil, coolant, hydraulic fluid, and fuel levels. Test the seat belt, hydraulic lockout, horn, alarms, lights, and mirrors, and tag out the machine if a defect affects safe operation. White-line the work area, confirm the location ticket covers the full route, and verify that all utility owners have responded. Ask the property owner about private lines, arrange additional locating where needed, and expose utilities within the tolerance zone using approved hand-digging or vacuum excavation methods. Check overhead lines and maintain required clearances, mark the swing radius, and establish barriers around trenches and excavations. Assign a trained spotter, agree on hand signals or radio calls, and coordinate pedestrian access with the property owner. Review ground conditions, slope limits, and edge setbacks at every work position, and consult the lift chart before using approved lifting points and rated rigging. Confirm each attachment matches the machine’s mounting system, hydraulic requirements, and weight class, then visually verify the coupler lock and perform the manufacturer’s recommended ground test after every change. Park on firm, level ground away from fire lanes and access routes, and review shutdown, lockout, and stored-energy procedures with the crew. To make these practices routine, post the operator’s walkaround checklist in the cab and require a completed, signed inspection before every shift. Consistent utility checks, equipment inspections, work-zone controls, and shutdown procedures help protect crews, customers, and surrounding communities, even when deadlines or familiar conditions create pressure to skip steps.
Frequently Asked Questions
What should operators check before using a mini excavator?
Inspect the undercarriage, attachments, hydraulics, controls, warning devices, and the surrounding work area. That includes tracks or tires, the bucket and teeth, the quick coupler and locking pins, hydraulic hoses and fittings, fluid levels, the seat belt, the hydraulic lockout, alarms, lights, and mirrors. Follow the manufacturer’s checklist, and keep the machine out of service until any defect affecting safe operation is fixed.
Why are utility markings important?
They help identify buried services that could be damaged during excavation and require special digging precautions. Striking gas, electric, water, or communication lines can cause fires, electrocution, flooding, and outages. Markings show approximate locations, so operators must still expose lines by hand or vacuum within the tolerance zone. Public locators also don’t mark private lines, which need separate locating.
Can mini excavators work close to trench edges?
Only when the ground, machine position, and required setbacks have been assessed and meet the applicable safety requirements. The machine’s weight adds pressure to trench walls and can cause collapse. Keep tracks well back from edges, never dig beneath the tracks, and reassess conditions after rain or when the soil changes.
What should happen before attachment maintenance?
Secure the machine and follow the manufacturer’s shutdown and isolation procedure to control movement and stored energy. Lower the attachment to the ground, engage the hydraulic lockout, shut off the engine, remove the key, and relieve hydraulic pressure. Apply lockout and tagout devices as required, and block any raised components with approved supports before anyone begins work.